| Go to: | 01 On-Line Directory | Book Info |
| Go to: | 01 On-Line Directory | Book Info |
Prog Panning
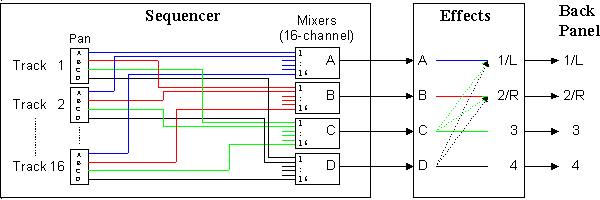
There are two sections where panning can be done: in the Prog section
and in the Effects section. The outputs of the Prog section are the signals
A, B, C, and D. These are inputs to the Effects section. The outputs of
the Effects section go to the back panel outputs 1/L, 2/R, 3, and 4.

Panning Progs (except Drum Progs)
Non-Drum Prog pans are set when you pick oscillators (OSC) on Page
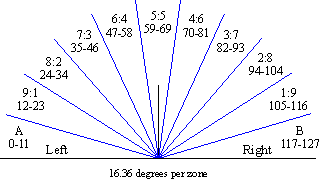
0 (EDIT PROG, P0:OSC, Line 3/4, Column H). Your pan options are: A, 9:1
thru 1:9, B, C, C+D, D, ALL.
Panning Drum Progs
Drum Progs are based on one Drum Kit. Each Drum Sound in a Kit (each
key on the keyboard) can be panned separately (GLOBAL, Page 1/2, Column
G). (Complete settings for all four Drum Kits are listed
in the Percussion Manual on pages 28-35.)
Your pan options are the same as non-drum Progs: A, 9:1 thru 1:9,
B, C, C+D, D, ALL.
When you define/edit a Drum Prog, you don't have any panning options for the Prog like you do for non-drum Progs. The Drum Kit pan settings are used.
Panning in the Effects
Section
In general, signals A and B always go to outputs 1/L and 2/R (which
are the same as the PHONES output). For details on panning in the Effects
Section (especially Panpots Out3 and Out4) visit the Effects
Page 8 page.
 |
|
Panning C and D
You can pan signals C and D to any output using Panner3 and Panner4
in the Effects Section. These Panners have 101 zones (Left, 99:1-1:99,
Right). This lets you position C and D more precisely in the 1/L - 2/R
stereo plane. (Details are on the Effects
Page.)
| A, 1:9, 9:1, B | Stereo panning between A and B |
| C, D, C+D, ALL | The Prog is converted into mono, then sent to the selected output(s) |
| PRG | Stereo. The pan setting of the Prog used. |
| 1 | In PROG Mode, select B09:MrProducer. |
| 2 | Play keys C#6 through F6. Notice how each of the five tom-toms are panned differently. |
| 3 | In SEQ Mode, set Track 1 to be Prog B09. Play keys C#6 through F6.. Notice how all five toms are now in the center. |
| 4 | Select the Panning page (Highlight "Edit:PRG" on the bottom line. Hold down Button E while tapping the 2 button) |
| 5 | Set the Pan for Track 1 to PRG (Highlight the cell in Line 1, Column A, and move the VALUE slider all the way up). Play keys C#6 through F6. All the toms are now spread across the stereo field again. |
On the plus side, this arrangement lets you control panning from the sequencer. The bad news is you need a separate MIDI channel for each different Pan setting. If you want the kick drum on the left and the snare on the right, you need to use up one MIDI channel for each instrument. If you want other drums to occupy different positions in the stereo field, you must send a MIDI Pan command each time you want the pan setting to change. This is manageable for most sequences, but the 01 gives you another option.
In the 01 sequencer, pan the Drum Prog to "PRG" (as described above). With this setting, the Drum Prog pan settings are preserved, and every key in the Prog can appear in a different position in the stereo field (like having 50 MIDI channels!). The bad news is you can no longer control panning from the computer sequencer - all MIDI Pan commands are ignored by the 01 when the Pan Cell is set to C, D, C+D, ALL, or PRG.
Use System Exclusive to set up the Drum channel
The only way to set the Drum Prog to "PRG" from the computer sequencer
is to use a System Exclusive dump. (There is no MIDI command for setting
01 Pan settings for C, D, ALL, or PRG.)
| 1 | Run your computer sequence so all initial settings are sent to the 01. |
| 2 | Change the Drum Prog Track Pan setting to "PRG". |
| 3 | Use a MIDI "Dump" to send the new 01 sequencer settings back to a file in the computer sequencer. |
| 4 | Before running the computer sequence, send that MIDI Dump back to the 01. The Drum Channel/Track is now set. |
Panning determines how much of your audio signal goes out which output.
Stereo output to a stereo
recorder or stereo PA system
This is a typical set-up for for simple recording and small clubs.
For this set-up, you would connect 1/L to the left channel and 2/R to the
right channel. You would then pan all sounds to go out 1 & 2.
Stereo output to external
mixer
This set-up uses outputs 3 and/or 4. The 01 can apply different effects
to outputs 3 and 4 than what's on outputs 1 and 2. For example, if you
run an organ with a rotary speaker effect out 1 and 2, you can run your
drums out 3 and 4 with reverb and no rotary speaker. You would then use
an external 4-channel mixer to re-combine the signals into a stereo signal
that you run into your recorder or PA.
Mono output to mono PA
The bigger the venue, the more useless stereo is - listeners on the
left side can't hear what's coming out the right speaker. You can use an
external mixer to pan all your outputs to center, and this is the easiest
approach to take. But if you don't want to mess with extra gear and cables,
you can pan all your 01 signals to center, making them mono.
| Go to: | 01 On-Line Directory | Book Info | Top of this page. |